Button-spiration: Spring Flowers Pt. 3

Here is the third installment of our spring button flower inspiration. Thankfully, spring seems to have finally arrived in Calgary over the past few days. The snow is gone We woke to snow this morning, but the ground is turning into mud, and we’ve had much needed sunshine! Hopefully you’re starting to experience some of this too, where ever you may be. Or maybe you’re already delighting in the cherry blossoms & daffodils. Just a touch jealous. We have some crocuses starting to pop up.

To keep our spring hope alive, let us turn to this easy-peasy, but adorable project from indieBerries.All you need for supplies are a pile of buttons, different sizes & colours (how much variation or uniformity you want is up to you) and florist wire. She has cute step-by-step illustrations/cartoons on her blog to demonstrate the project. I so very wished I had time to make some of these right now. I feel like our kitchen could use a little bright colour. Alas, the little bits of free time I have are being dedicated to prepping for the Boutique Wedding Market. Perhaps you’ll have a spare moment in the coming days to give these a try? I do hope so. Enjoy!
Button-spiration: Spring Flowers Pt. 2

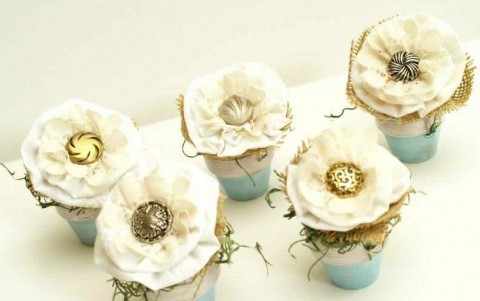
Button flower pots by Flamingo Toes

Here is another adorable spring button flower project to keep you busy until we can enjoy actual flowers in the yard. The full tutorial can be found on the V Spot blog, by special guest blogger Flamingo Toes.

These little potted fabric flowers are actually quite small, only about 4″ tall. You can pick up all sorts of sizes of clay pots at the craft store these days (and they’re usually very inexpensive). You can either paint the pots, or leave them as is, depending on the look you’re going for. You’ll need some stuffing and faux green moss to fill the pots. Next choose some fabric and burlap to make your flowers. Really, you can use any fabric flower tutorial to create the blossoms, it doesn’t necessarily have to be the style she used here. I would likely use some of my scrappy flowers that I use to make the floral hair combs & brooches. However you decide to make your fabric flowers, just pop a button into the centre of each to finish them off.

Pretty darn adorable project to decorate a fireplace mantel, small shelf or Easter dinner centerpiece. In fact, they’re so simple to make, you could put together one for each Easter dinner guest to take home with them. Attach a little name tag to the pot and you’ve got adorable seating place markers. Lots of ways to use these guys! Have fun creating!

Button-spiration: Spring Flowers Pt.1

The official arrival date of spring has come and gone. In Calgary, that typically means we get more snow (no joke). This year is not much different, except that it is unusually cold out still. By now, the temperature is a little more mild, but the last few days have felt like full-on winter again. Le sigh. I am feeling VERY done with the snow & cold this year. I’m longing for those days when we can spend hours outside playing & discovering with Sam. Soon, soon, I keep repeating to myself. Well, not soon enough!

As we wait for the snow to fully melt, the ground to thaw, and a tiny hint of green to poke through, I thought we could embrace some simple spring flower button projects. This one is the first in a series of ideas, all collected on my Button-spiration Pinterest board. This cute egg carton button art project is brought to you by Mod Podge Rocks. She cut up a paper egg carton to form the flower blossoms, then had her kids paint and decorate them. When the blossoms were dry, they glued a button into the center of each. A bundle of pipe cleaners were tied with a ribbon to create the flower stems. Everything was then glued into place on a canvas (which she had painted beforehand, although you can now purchase coloured canvases from the craft store, if you’re short on time).


Sammy and I are using this flower egg carton idea to decorate a spring wreath. Hubby made a large twisted twig wreath several years ago, which we hang on the front door at this time of year. It needs a bit of colour to offset the current dreariness these days, but I don’t want to permanently attach anything to the wreath. I like the idea of having a wreath we can decorate a few different ways. I’ll get Sammy to paint & decorate the egg carton blossoms, then poke two holes through the bottom of each blossom & attach some yarn, so we can just tie them onto the wreath. Once the yarn is through the holes, we can cover it up with a button in the center of each blossom. I’ll try to remember to a) take pictures as we finish working on this and b) find the time to post them.

Until then, have fun playing around with your egg carton flower art!

Button-spiration

If I have one goal in life, it is to instill a love of buttons in our son. Okay, so maybe there are a few other more important things to achieve first, but a mama can dream.

Imagine how tickled I was to come across this super cute game for kids using buttons! The full write-up can be found on the Inner Child Learning site. All you need is a pile of colourful buttons, pipe cleaners, cards with the corresponding button colours written on them, and a single die.

To play, you simply put the cards face down in a pile, roll the die, and the number you roll is the number of cards you take. Then you thread the buttons onto the pipe cleaner in the order you drew them. The result, colourful button flowers, which you can make into a bouquet! Of course, like most games, there are elements of learning involved. This game teaches fine motor skills, colours, words, sequencing & ordering, and counting. Sounds like a great game to play at a kids birthday party! Guests get to go home with a pretty bouquet and you could always provide a uniquely decorated flowerpot for them to keep.

When do you wanna come over and play?